Onwards and upwards. Lord Gumtree Climb – 2019 Retropost.
Lord Gumtree is a lesser known climb taking in some of the same sections of the Mt Buffalo Gorge North Wall as Ozymandias. In fact, Lord Gumtree shares the same first pitch as Ozymandias and last two pitches as the direct. Where they diverge – a path far less traveled – offers harder and objectively riskier aid climbing. This post tells the story of my attempted Lord Gumtree Aid Solo climb at the end of winter and the circumstances around my retreat.
Mt Buffalo – North Wall of The Gorge. Lord Gumtree trends right of the yellow streaks.
After completing my aid solo ascent of Ozymandias Direct, I decided I would try some harder aid climbing and explore the other facets of the Mt Buffalo Gorge North Wall. This also presented a nice opportunity to take the Defender Rap approach and make a direct comparison with the South Side approach (tip: they are both heinous).
Although technically I started out in the first week of spring, I think it would be fair to claim “astronomical winter” – particularly with ample snow cover on the plateau and recent snow-fall. There were mounds of snow on Führer ledge and even a small pocket still clinging to big grassy!
Three’s a charm, – or neurotic…
Unfortunately this was an attempt only. After the fourth pitch I retreated to Big Grassy and would later continue via Ozymandias Direct.
Three months earlier I could not have imagined “bailing” UP Ozy …
The scared climber often points his fear at the ground, believing that retreat will deliver a more comfortable state of mind… learn to aim fear at the belay above.
More scrawls and marginalia… Copyright-blocking hooks. Guidebook from Open Spaces Publishing.
Standard Big Wall Fare
Day 0 – Defender Rap Approach
I left home at 0830 and hit the great alpine road. There were some recent snow dumps and low temperatures, so as I got above Dinner Plain, the road conditions became quite sub-optimal. Much worse in fact than any of my previous trips. At one point before reaching the resort, I was forced to make a complete stop by a vehicle in front. Regaining traction was an amusing prospect.
As I reached the alpine resort – chains were mandatory and it was obvious why. The road was encrusted in ice and snow. On the west side of the resort, the spin-drift was so intense that it was an effective white-out. I struggled to differentiate the snow bank, the road, or the car in front of me. So I crawled along barely above idle for a kilometer or so.
I arrived at Mt Buffalo to find the visitor car-park closed for snow clearing. After braving the cold to sign the intentions book, I drove back down to the oval to park nearer Wilkinson’s lookout and the Defender Rap. As soon as I pulled off onto the snow covered shoulder, the wheels were spinning and the car sliding around. I had to install tyre chains to be able to park in a civilised manner though I was more concerned with departing some days later in case of more snow fall.
I loaded up the pig and struggling to balance began to traverse the snow-covered oval towards the Gorge tourist trail. Despite being much easier terrain than the South Side approach, there was plenty of ice and snow and I still managed to sprain my ankle. (Previously damaged 5km into the 10km Grampians Wonderland Loop hike…) What’s a big wall approach without some form of injury…
Mt Buffalo Gorge Tourist Trail – First week of spring.
Locating the Rap
Along the tourist trail, 30m before the Young Galaxians boulder, deviate South East for about 30m to find rap chains amongst some boulders atop the escarpment.
Riding the Pig: A technique used when rappelling with haul-bags (Pigs). The rappel device is extended away from the body and the Pig is hung from the device (not the harness). The Pig is straddled and rode to glory.
Defender Rap
1: 60m, to double bolt belay. Be sure to pull the knot over the edge on first rappel.
2: 47m, to double bolt belay 5m right.
3: 52m, to Führer Ledge.
Defender of the Faith Rappel Topo
The wall was icy and dripping wet. My ropes were dislodging little pellets of ice from the shrubs and rapidly became saturated with muddy run-off. As the rope ran through my ATC device, seemingly litres of ice cold, muddy water were squeezing out of the rope and running down the tails of rope onto my brake hand and down my leg.
On the final rappel pitch, the bottom 8m of both my ropes landed in what was essentially an ice water pond at the base of the wall. Straddling the pig, I managed to scuttle across and complete the rappel to the left of a spirited waterfall.
Führer Ledge Slush Fest
I had reached Führer Ledge.
The prevailing emotion would be one of nostalgia for those left behind; combined with a spirit of bold curiosity for the adventure ahead!
(An overly optimistic evaluation of my state of affairs)
Difficult gully thrashing and two more rappels gains the area directly below Ozy and the ‘Turret Bivy’. Cosy for one – cramped for two.
Turret Bivy – more secure than it looks
Traverse to Ozy
The front edge of the icy pond where it flowed down, away from the wall and over the Führer ledge, had formed a kind of “snow bridge”. I tried to use this to get across the pond but the weight of my gear caused me to punch right through. Before even finishing the approach my ropes, shoes, socks and pants were already saturated.
There still remained some bush-bashing and a couple of low-angle traversing rappels through scrubby runnels and what is apparently a gushing torrent of water in the winter. This meant alternately packing, pushing, hauling, dragging and riding the pig while negotiating scrub, trees, snow and running water without falling in!
1: Right up and over the rise then scramble down to a drop. 46m rappel off tree.
2: Long, indeterminate double rope abseil down wet, loose, brackeny, creek-bed gully gets you to the base of Ozy. Find the tree with tat. When you see the smooth rock opposite to the main wall – you want to be on that side. Don’t slip or you’ll swing off into the winter stream (with all the added inertia of the pig!). I did. I also missed the tree with tat so still had my rappel rigged higher up further towards the wall and couldn’t get back out.
Debris in the Water Runnel Environs
Apart from getting beat and wet I did find a nice offset HB nut amongst the rocks. This factored nicely into my micro-nut water fountain anchor.
I was gold-panning with a friend recently in East-Gippsland. This reminded me of his explanation how the dense metals (aka heavies) fall out of suspension in areas where the water current slows. The winter-stream that forms down the foot of the North Wall is essentially collecting all the booty and depositing it amongst the stones!
Booty – n. gear left behind for the taking, usually either from a previous party bailing on a route or accidentally fixing gear
In previous trips into the gorge, I had noticed occasional styrofoam beads scattered around the otherwise pristine Crystal Brooke Bivvy site. Now I came across the source of this insidious pollution: a plastic bag full of bean-bag filler lodged between rocks in the approach gully run-off. This really broke my heart.
The degraded bag had been gradually releasing thousands of styrofoam beads into the Mounts Eastern watershed. I carefully removed the bag for proper disposal and collected as many spilled beads as I possibly could. Later I would even seen beads lodged high on the escarpment – carried up by the wind.
Polystyrene is a truly hideous product causing immense damage to so many animals and natural environments. It fragments into millions of tiny non-biodegradable pieces, scattering through sand, soil, and water posing an extreme difficulty to collect or remove.
I also manage to cut and remove a large amount of old abseil tat from trees left behind from decades old excursions into the gorge. I established a rubbish container to haul up below my pack on the multi-day climb.
Tat
Tat: Weather-beaten and ragged slings, left behind on belays, bolts, chockstones and threads. Often to be treated with extreme caution. On longer routes that you may have to abseil off, take up some tat with you that you can use for an anchor and leave behind, rather than leaving more expensive nuts etc.
Setting in for the night
Before dinner I set about housekeeping.
I stepped across to the foot of Ozy to install my anchor in preparation for the next mornings start. The trusty weeping crack I have relied upon in the past was now a verified water fountain! No ball-nuts this time, I’ll admit the ball-nut was a joke piece.
Crystal Brook was churning a maelstrom, with white frothing waterfall. No crossing would have been possible for a south side approach – save by pulling through rapidly flowing ice-cold water. All the stepping stones were submerged. I filled up several soft drink bottles with water, as is procedure.
Crystal Brook: Extra (I think that’s what the kids say)
After an enthusiastic and intrepid start, I settled into the evening but I knew my mind was not in the right place.
Normally the Solitude and Commitment (the state of being committed by external factors – not necessarily the internal state of dedication) would give me clarity, focus and calm.
Normally this would be a welcome respite from the thoughts and feelings of everyday life.
Today I couldn’t quiet my mind or put away certain feelings which I would carry up the wall with me. I think this was a factor in why my attempt at Lord Gumtree would be only that.
Day 1 – Lord Gumtree Attempt
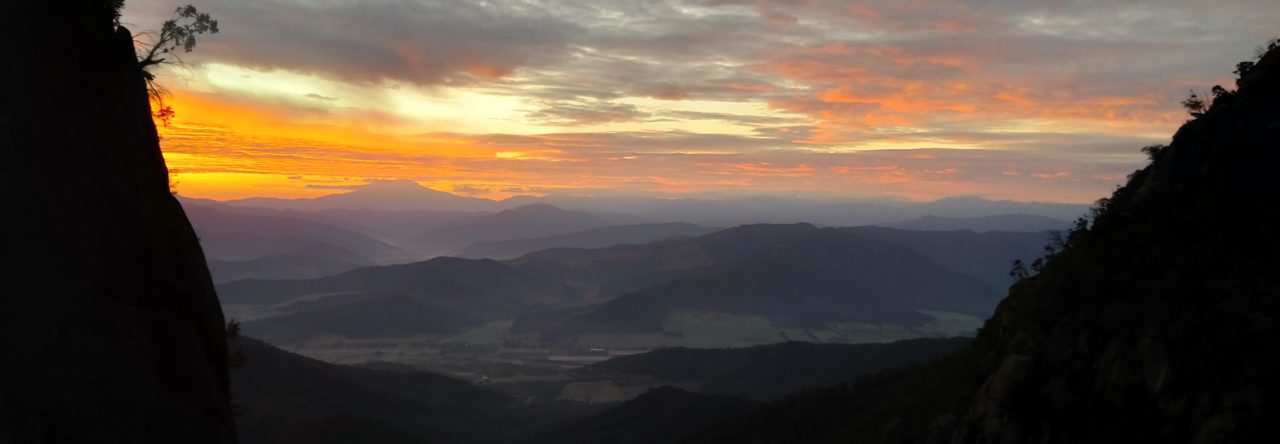
Eighty-five miles distant is the faint outline of Mount Kosciusko (altitude 7328 feet)—the highest peak in Australia. In the middle distance stands Mount Bogong (6509 feet), and to the right Mounts Fainter (6160 feet) Feathertop (6306 feet), and Hotham (6100 feet).
Sunrise from the Turret Bivvy – At the foot of Lord Gumtree / OzymandiasVictorian Alpine Region – Mt Feathertop snowcap (please comment if I messed up the annotations)
27m M3. Traverse R at horizontal to join Lord Gumtree. Good wires, cams, hooks.
The crack was obvious if somewhat vegetated. This climb obviously receives far less traffic (if any) than Ozymandias, and the crack was mostly filled with dirt/mud/grass/moss and general water and slime. I was spending most of my time digging for placements with my nut tool and nothing was apparent without a bit of excavation.
Pitch 3:
27m M3. HBB higher than shown in Lindorff/Murray Topo. (Level with Ozy P2 HBB . More digging for placements. By this time my chest and sleeves were becoming soaked in cold mud.
Pitch 4:
30m M6 to HBB on Dirty Sloping Ledge (If you thought Big Grassy was bad…). Difficult, dirty, grovel up left to big grassy – not recommended but I’ve yet to investigate other Bivy options.
Yet more gardening only the placements become less frequent and more marginal (mini-offests, RPs).
This was very psychologically taxing with no visible placements (good or otherwise). Standing-idle against wet rock and rope, scraping mud out of, ice-cold rock only to find marginal placements at best, delivers cold-comfort.
I soon learned the number 3 Pecker I had recently acquired made short work of the blade-thin seams and blown-out pin scars.
Pecker – A thin piton resembling a bird’s… beak.
Placed passively as a hook (NOT hammered), a Pecker (AKA: Beak) can offer non- destructive and secure protection where nothing else will. The sharp point inserts itself and drives down into the thinnest, deepest constrictions. These are pieces of last resort for difficult trad or clean aid climbing alike.
It was recommended to me to carry a talisman-beak for these more technical aid endeavors and it payed dividends. More than simply a Talisman it proved a valuable tool through pitch 3 and 4. I assume a beak or two will be crucial for the blown-out pin-scar micro-nut placements on the crux but I will have to find that out another time…
Dirty Sloping Ledge
Unlike Big Grassy; Dirty Sloping Ledge is tantamount to its name.
In the cover of darkness I made it to the “dirty sloping ledge”. Sleeping there does not bear thinking about but it is only about 8 metres up to big grassy from the left. It is 8m of dirty strenuous grovelling but the relative luxury of Big Grassy was incentive enough.
At some point in the lower pitches I had bumped into a fellow soloist who was “fixing up” to BG but Bivying on the ground for the night. We had exchanged only a few words but his presence provided some much needed motivation to get my task done. I knew he intended to continue up Ozymandias Original the next day which gave me the space to take Ozy Direct as a Plan B.
I set up my hammock and anchors under his fixed ropes and made sure to keep everything neat and free knowing he would be jugging up in the early hours while I too would be setting off.
Day 2 – Retreat to Ozymandias Direct
Sunrise on Big Grassy – never gets oldRemnants of snow on Big Grassy – oh yes, that is the only somewhat flat and level area.
In the morning rapping down to the ledge to do the crux was too daunting. Especially knowing I’d be digging out wet mud and grass to try and find marginal RP placements with a possible chance of a ledge-hit should I blow it on the crux. This was apparently proven by Tony Dignan but I don’t have any details – if any body knows the story please reach out.
I didn’t have the heart to down-climb to the Dirty Sloping Ledge and resume the wet, cold suffer-fest directly into the crux pitch.
I retreated onto the familiar upper pitches of Ozymandias Direct…
A pleasant (relieving) jaunt up the corner on solid gear (large nuts).
Pitch 6:
I met the fellow climber again at the Great Roof Belay where he caught up to me and would traverse left to take the original route. I remember commenting about the chances of running into another aid soloist on the same route and we took some pics of each other in our wildly exposed predicaments; myself hanging on some tat under a roof and Alec tip-toeing a free traverse, flat into the wall. Both some 140m off the deck.
Cursed Ascentionist gaining the roofAlec stepping out (light and fast)Cutting loose the pig
Pitch 7:
After this point we would not see each other again. My boost in spirits waned and I went into overdrive. I wouldn’t be spending the planned third night at Gledhill Bivvy. Instead I became determined to finish the route and extricate myself not from the climb but from my own thoughts and feelings. And so I continued in one more push which would take me through to the early hours of the morning, topping-out in two-days what previously took three very long ones.
Truly sickening fixed-gear on Ozymandias Direct (in the pea-pod) – yes, that is a downwards-pull rusty piton in a wedged chockstone and a welded-in micronut with tat on the other side.
Pitch 8:
On my first attempt of Ozy I commented the following about Pitch 8:
“Contemplating a simple but critically exposed and run-out free move to gain the ledge below the P8 chimney; meanwhile the clouds a closing in!”
Free move: Climbing without unnatural aids, other than those used for protection.
This time there were no clouds to be seen – only the pitch black of darkness. It was nearing midnight in winter, and the free move is now a very wet and slippery slope. I couldn’t make any purchase on the wet slime. After deliberation and several attempts I began trying to use a micro offset nut as a point of aid in the shallow, flared, wet crack. It would not hold even the most minor bounce test. I managed to gently ease my weight onto the piece.
Try not to breathe…
I gingerly took a step up and another and suddenly I heard a sharp ping as the RP shot out. I face planted the wall. In the moment it took to process what had happened, the rock was whizzing past my face and the rope ripping up through all the gear. I was sliding rapidly towards the edge!
The rock in front of my face disappeared suddenly and I myself free-falling as I shot off into the black.
The first piece of pro below my doomed aid point had blown out and I’d just taken an absolutely sickening whipper. The wet slope acted like a water slide launching me face down, feet first off a ledge and into the darkness! I believe this was around a 6m whipper from the ledge.
Whipper: A lead fall from above and to the side of the last clip, whipping oneself downwards and in an arc.
Sickening Fall from the wet P8 free moves
After I got my heart rate under control I jugged back up to the ledge and contemplated the awful prospect of still having to climb the water slide that just spat me off. I managed to do it with free moves this time as the prospect of taking the same fall again chilled my already freezing bones.
The thing about aid falls unlike with free leading is that you have no time to anticipate or prepare – they happened suddenly, without warning.
The thrutchy chimney leads to straight forward #5 cam jugging up a corner flake. I was on full auto-pilot by this stage and topped out a few hours before sunrise.
Escape to Reality
Could hardly lift my arms or focus my blurry eyes. Slept in car at bottom of the mount. Woke early.
Picked-up coffee and some cinnamon doughnuts in Bright. Caffeine and sugar. Began the home journey back over Mt Hotham.
During the drive I contemplated my achievement and shortcoming.
I contemplated what had occupied my mind these past three days.
I hope to meet the challenge of climbing Lord Gumtree and experience the mystery of the Gumtree Bivvy. The only description I have been able to find are words from first ascensionist Chris Dewhirst referring back to 1971:
The line of bolts creating the two tier hammocks position was fantastic. Pete and I slept well and we handed food and drink up and down the bivvy.
If I ever climb Lord Gumtree again, I would like to take the time to really enjoy it the way Dewhirst described. Perhaps it is an adventure better suited for a team…
Looking back on this whole experience, I can see a real opportunity to climb light and fast in a single day. Eliminating the need to haul and pack-down Bivvys could easily free up 30% of the time taken. Perhaps Ozymandias Original… I have heard the upper chimney pitches are hell for hauling.
After the ordeal. I was actively taping my shoes together to protect my feet during the latter part of the ascent. Needless to say the hike back to my car through the snow was quite something.
This year I completed a solo Mount Feathertop Winter Ascent and snow-shoe hike across the Razorback. Hoping to improve my considerable lack of experience in alpine travel and snow camping I did this the best way I know how: jumping in the deep-end!
I planned a four day adventure hike taking in Mount Feathertop Summit and the Razorback with two classic spurs providing ingress and egress: Bungalow Spur and Bon Accord Spur. This meant spending three nights camped above the snow-line and hiking in snow-shoes with a full-complement of winter survival gear.
A daunting prospect for my first multi-day hike, and first snow-camping experience!
Mount Feathertop is Victoria’s second highest peak at 1922m. Although humble by global standards, it is considered Australia’s most technical mountain (this does not say much for Australian Mountaineering!). Unlike other Australian peaks, Mt Feathertop develops a classic snow-cap: steep and pointed with prominent cornices.
The Razorback is an exposed rocky spine joining the Mount Feathertop to Mount Hotham at close to summit height. It’s 11km are largely above the tree-line. The Razorback is severe as it is beautiful.
Preparing for a Mount Feathertop Winter Hike
As I was not taking any climbing equipment on this adventure I decided I would suffer the weight-penalty to cook all fresh-food. While eating only dehydrated meal pouches for 4 days and carrying my excrement in a container up a 300m rock wall, I discovered intimately that “back-country cuisine” makes your sh*t smell like “back-country cuisine”… Needless to say I no longer reach for the dehydrated meal pouches as my first choice of sustenance…
Fresh food is an interesting and bad trade-off: For 4 main meals I increase weight by about 4.2kg, but I will use 1 litre less of water. This is an insignificant change in fuel requirements particular if I am already melting snow for drinking. On the other hand it reduces the total amount of water I need to carry on a day-to-day basis, and the time taken locating springs or melting snow.
My fresh meals are around 1kg each once cooked (probably a bit less due to evaporation) and also provide lunch the next day; whereas the dehydrated meals will be only around 320g providing minimal sustenance and no lunch.
Overall dehydrated is much more efficient if you can stomach it – for me I’ll save this distinct pleasure for when it’s really necessary. Besides the added weight will only benefit my training.
I prepared the following, ready to cook:
Pizza dough with a pouch of chopped pizza toppings
Butter chicken in marinade with coconut-rice pouch
Seasoned taco filling
Fresh naans, English muffins and tortillas
Ham, bacon, eggs, cheese and butter.
Tomatoes and avocado,
Chai tea and fresh ground coffee
Selection of Fresh food for Mt Feathertop.
To offset my gourmet feast, I decided to swap my two-man hiking tent for a Bivy bag and ultralight tarp – the same system I used on the Ozymandias approach.
I now had my base-weight down to 15.4kg including about 620ml of liquid fuel. Add to that 5kg of food, 1.7 kg of water, a camera and some other miscellaneous crap and I was looking at a 24kg total.
Weight distribution for Mt Feathertop Winter Hike
As comrade Dyatlov would say “Not great, not terrible”…
Gear load out for Mt Feathertop HikeA couple of new toys: Piolet, Snow-Shoes and white-gas stove
My main concern was condensation on the inside of the bivy sack reducing the insulation of my down winter sleeping bag. Hopefully with enough ventilation, the only condensation will be on the outside of the bivy sack or under the tarp.
As it turned out, basic overnight warmth would be my biggest problem.
Dangers of Mount Feathertop Winter Ascent
Cornices on Mt Feathertop and the Razorback have contributed to numerous accidents over the decades. Hellfire and Avalanche gullies are so named for a reason!
Cornices on Mt Feathertop South East Face.
Tom Kneen, a Melbourne University Mountaineering Club member, died on the Mount in 1985. He and two companions had unwittingly strayed over the cornice in white-out conditions when it gave way beneath them. Being closest to the edge, Tom was lost under the avalanche debris. The others suffered only a fall.
By chance I met one of the three companions in a local outdoors shop the day before my hike. He was by no means the first to tell me of the insidious Mount Feathertop cornice, but hearing the story first-hand became a vivid warning.
The trail from MUMC hut to the base of the summit is named after Tom Kneen.
The interior circumference of the MUMC hut contains the names of members who have perished in Mountains around the world, several on Mount Feathertop.
Day 1 – Bungalow Spur Ascent Hike
Bungalow Spur is a well defined trail leading from Harrietville to Federation Hut and the Mt Feathertop summit. Far less technical than my South-Side approach to Ozymandias, I underestimated the difficulty of a long and sustained climb. It is considered a grade 3 hike and rises 1400 metres over 12.5 kilometres. In winter perhaps half will be under snow.
I wake at 0600 and depart by 0730. Another road trip on the now familiar Great Alpine Road, this time with snow chains ready! I set up altimeter and temperature monitors on my car tablet and observe the elevation gain and concomitant temperature drop with intrigue.
At 1350 metres I see my first glimpses of snow, and I can’t wipe the childish grin from my face. This snow-line observation may help orientation on the hike back up.
I drive cautiously through the Hotham Alpine Resort. 2WD: must fit chains, AWD: chains recommended. I decide to hit it raw and the Subaru did not disappoint. The greatest risk was the swathe of wayward skiers and boarders criss-crossing the village. I descend to Harrietville down the steep twisty road.
I arrive at the Bungalow Spur trail head at 1230 and fill out the intentions book. There is a school group ahead of me staying for a night at Federation Hut.
Bungalow Spur Trail HeadBungalow Spur – Mountain Ashes give way to Snow Gums and evidence of fires
Initially I move fast on well-graded terrain, but the grade soon steepens. Within a kilometer I encounter my first challenge: heat and moisture management.
Clouds closing in on Bungalow Spur
I strip down to my wool under-shirt and roll up my pants. I would hike this way well into the snow-line and sunset. Conscious that any moisture on my clothes will freeze overnight I am forced to unnaturally slow my pace. Difficult when you are excited, with burning quads, and you just want to set up camp already!
T-shirt in the snow – Bungalow Spur
Thermal management is a fine balancing act – move too fast and the sweat reaches critical-mass… stop moving for more than a minute and the moisture evaporates, creating a highly efficient air-conditioner in the already plunging alpine temperatures.
First signs of snow on Bungalow Spur!
As I begin to encounter snow again, my pace slows considerably and overheating is now much less of an issue. I find the path well-beaten (by the preceding school group) and do not have to put on my snow-shoes until I reach Federation Hut later in the evening.
Sure enough, more snow!The trail is now completely covered in snow.
A small spring exists a couple of hundred metres south-east of the trail from the Old-Feathertop Hut Site. Even in the snow, I found the spring flowing abundantly (though no crystal brook!), and filled my Nalgene bottle. Don’t be fooled by the marshy weeping section over the track – listen and continue: you can hear the spring a little further along.
Sign-post for Spring- Bungalow spurSmall but gushing spring!
Despite warnings I encountered no complications drinking this water untreated and I enjoyed it immensely! I suspect the fresh snow melt in winter adds to the purity.
Crystal clear spring water – looks good
The clear Nalgene bottle with marked gradations made it easy to ration water, and see any particles. The wide mouth makes it easy to pack in snow when needed and it can also be used as a hot water bottle. It is heavy but durable, so much so it could possibly serve as a desperate dead-man anchor! I think it is worth the weight over a re-used throw-away.
Dead-man anchor: An object, which lies horizontally, is buried in the snow to serve as an anchor for an attached rope.
I don my pack and push on. It is getting dark now as the sun gets low in the west and clouds move in. I know I am close now as the spring is located near Bungalow Hut ruins, about 2km before Federation hut.
The trail ahead, getting dark.Looking back down the trail
Federation Hut Snow Camping
After 5 hours hiking, I reached Federation Hut at 1730. I acknowledged the school-group, hung my t-shirt in the hut to dry and continued halfway to the saddle, where I could be secluded.
Stunning clouds to the south west as I approach Federation Hut surrounds. Don’t forget to look behind you from time to time!Federation Hut surrounds, looking towards Mt Feathertop.
As the sun set, it began raining and I set about building my first camp. It hadn’t occurred to me that rain would be possible at this altitude. This is another challenge of Australian alpine winter. I put on my rain-shells and spent two hours making camp as comfortable and protected as possible. I’d be spending two nights here.
Sunset as I set up camp
I started by digging a coffin-style pit for my bivouac bag. As I progressed, I discovered I could actually cut out snow-bricks. This was like discovering fire, and I quickly began producing snow-bricks for my other structures. The wet/warm snow made it fast and easy to cut surprisingly square blocks. It was like real-life minecraft and I was really having fun!
Snow pit shelter
I walled up around my coffin-pit at the head and windward side, and embedded my tarp all the way around. I continued the excavation with a smaller trench at a perpendicular angle forming an area both to sit and enter into the bivy. Using more bricks, I created an arm-chair, and a sheltered cooking bench on opposite sides of the smaller trench! By fitting a hiking pole here I could lift the tarp over the cooking-area as well.
I upholstered my makeshift arm-chair with a foil sheet and square of EVA foam. After 8-hours on my feet, finally I could sit and relax in style, with feet up! Definitely worth the effort.
Snow pit and kitchen area
By this stage the snow was so wet and soft that I was even post-holing with my snow shoes if I was not careful.
I decided to cook tacos for dinner. While boiling snow for water, I figured out I could use a fry pan as the lid to steam up my tortillas. I then put my gloves on top of that to dry them out some, and added my snow shoes as additional wind shields!
Efficient utilisation of heat would be important with limited fuel. Also I didn’t want to sit idle in the snow any longer than necessary to perform basic camp logistics. I had enough hot water for tea, and to fill my Nalgene bottle which I threw into my sleeping bag to warm it. This would also prevent my water freezing overnight.
The tacos were absolutely comfort food – I had made much more effort with the sauce than usual. I left a few in a pan in the snow for the next days lunch.
As it was clearing up, I set out for a night-walk to the saddle, traversing across the southern slope between the hut and summit. The snow was still too mushy and I was often sliding. Even with snow-shoes, it seemed too sketchy. I decided to try again tomorrow with ice-axe and day-light.
I set a candle into the wall of my shelter, using a pot lid as a reflector, like a snow-sconce, and pulled the tarp low. Probably psychological but it felt warmer and I could write my journal by the considerable light.
The sky was totally clear now. The stars were so bright I could navigate without my lamp even though it was a new moon. The three marker lights of Hotham Village shone out across the vastness of the valley.
Later I wandered down to the hut to claim my T-shirt. There were a couple of students and a teacher savoring the last few hot coals in the fire. Despite the smouldering coals, walking into the hut felt like entering a sauna. I shared some stories with the group, they were good guys. I think a few times the teacher may have used me as an example to the kids of “what not to do”.
Probably fair enough.
Comfortable pit for the night
I left for my icy coffin-hole before becoming too comfortable in the hut. The candle-light under my tarp flickered through the barren trees to guide me back to shelter.
My bag was toasty warm and the Nalgene hot-water bottle worked remarkably well rejuvenating my frozen toes. The slightly feet-down slope helped the blood return and I recommend this over a flat lay.
Day 2 – Mount Feathertop Winter Ascent
Mount Feathertop Summit Panorama
I wake up very early, well before dawn. An Alpine start! Not exactly… I woke up cold. My hips and butt were going numb where they were digging into the snow beneath me. I was cold enough that I couldn’t sleep but not cold enough to get out of my bag (half-naked) and do anything about it.
Instead I languished for a couple of hours in moderate discomfort, contemplating my plight. I pulled the puffer-jacket which was my makeshift pillow onto me but this did not help. Finally I rose. Apparently my sleeping pad had deflated overnight. My body heat was seeping into the frozen ground.
First light in the snow pit
By now my boots were frozen hard and I had to beat them with my fists before they were compliant enough to get a foot in. My gaiters were also frozen and so were my gloves.
Crystals of frozen condensation on the tarp
I drank from my still warm hot-water bottle and used the last 200ml to start boiling snow – enough to make coffee and defrost my second insulated bottle with enough left over for the day. I threw the insulated bottle into my bag so it would not refreeze – this became a convenient daily cycle to warm my bag and maintain liquid water.
Finally up, coffee brewing
First breakfast in the snow: Egg and Bacon muffins and fresh coffee. Not bad! It was warm and nourishing. I defrosted and heated my gloves on top of the cooking pot.
Brewing Coffee and heating gloves (and egg)The pit in all it’s gloryDespite it’s short comings, the pit has magnificent views of the Razorback and Mt Hotham
Thanks to the clear skies, the temperature is much lower, and the wet snow has frozen solid overnight. It is still early and the surfaces are now hard and icy with good friction. I set out in my hiking boots allowing me to move faster and more efficiently in the hard snow.
View of Federation Hut from the base of Little Mt Feathertop.View of Federation Hut from close to the saddle.
Traversing the slopes from last night feels much more secure with the axe in my up-hill hand. The snow is also in better condition.
Steep slope to navigate to the saddle (The cross area)Awesome vista. This will be my path for tomorrow.
By 1030 I am setting off from the cross. The cross is a saddle formed between Mt Feathertop summit to the East and little Mt Feathertop to the West. The Razorback joins to the South. Once there was a makeshift crucifix marking the location but this is now lost (or removed…).
Directions at “the cross”
The saddle is now guarded alone by a much more fitting sentinel: an ancient, gnarly snow-gum.
The wise old snow-gum, shot later in the evening.
Mount Feathertop Summit Climb
Looking to the Summit up South-West spur in bright morning sun. Northern spur to MUMC hut visible to the left.View to Avalanche Gully from the base of the Mt Feathertop summit.
I finally began the crux of my Mount Feathertop winter ascent. There was no visible trail up to the summit and I broke my own path. This was a treat. Two sections on the summit climb were significantly steeper than the average grade and required me to cut steps with the axe. Kicking steps would have been an option but in any case the axe is a very desirable insurance policy to arrest falls.
The steep final climb to the summit
Steep Snow drop-off into Avalanche Gully
View back down the South-West spur to the saddle – Little Mt Feathertop on the right.
The school group climbing Little Mt Feathertop.
Mount Feathertop East-facing cornices. Beautiful and deadly.
View to the East and Hellfire ridge.
Taking advantage of the clear weather, I used the map and compass to relate some landmarks on the Razorback. I could make out the Molly Hill cairn and Big Knob but these were relatively close.
Some Mt Buffalo landmarks including Ozymandias – the location of my last adventure!View to the East from the summit and the North Razorback
Chunky cornice
View of the Razorback from Mt Feathertop summit
View of Mt Buffalo to the North-West from Mt Feathertop summit
East of the summit
The North Razorback looks like a more dangerous ascent
A view of the Razorback looking South
Chunky Cornice
A view back to the south-west spur showing the false summit
Southwest spur, cornices and the false summit
South-west spur to the Razorback
Summit selfie
The slope back down steepens and drops off.
By the time I began my descent it was about 1230 in the afternoon and the sun had moved sufficiently westward to being softening the slope. The snow had melted just enough to ease kicking steps with my heels on the descent. This added considerably to security. I suspect attempting to ascend in the afternoon would be slippery and warrant snow shoes.
Avalanche Gully
Ridge and cornice up to the summit
View of the Razorback and Adams Rib in the foreground
Cornices on the south-west spur
Looking back up the cornices and Avalanche gully / Avalanche spur
There is an antenna tower on Mount Hotham summit that from a distance is like a pin sticking up. This is a prominent landmark visible due South from Mount Feathertop and for most of the Razorback. Later when I trekked the Razorback I used it as a guide. As it gradually grew larger in the distance I knew I was getting closer to Mt Hotham and Bon Accord Hill.
The “pin” tower on Hotham as I affectionately called it. Landmark due South of Mt Feathertop.Close-up of the Hotham summit.
MUMC Hut Visit
Looking from the saddle towards Mt Feathertop and the ridge to Tom Kneen trackMUMC hut visible on the tip of the spur
After eating my stale left over tacos I decided that I would snow-shoe to the MUMC hut. Reasoning that I could see the hut from the saddle, and was well oriented to the Summit, I did not bring my map or compass.
Clouds moving in towards the Feathertop SummitA single climber making their way up the south-west slope of the Mt Feathertop summit
Again, no trail was visible. Instead of traversing around the North-West face of the summit, I continued due North down the wrong spur and ended up in a valley facing a creek. At least I could refill my water.
Ice-cold Stoney creek
Hopeful I might find a way up another spur across the creek and I found a section narrow enough to cross and began to climb up the other side. The terrain only steepened and closed in. It became clear I was off-route and could not re-join the main spur.
North of Stoney Creek, looking up at the ridge I had mistakenly followed.
Wishing I had brought the map I retraced my steps to the creek (lesson learned!). I certainly did not want to retrace my steps up the steep, slippery spur all the way to my origin! Thanks to modern technology I was able to bring up the Google maps satellite overlay. Clearly the spur I should be on was just East beyond the creek and gully spilling down from the summit. I remembered the spring marked on the map, 0.5km from the cross, on the western face of the summit. This must be the origin of the creek I had crossed.
Rather than the long walk of shame, I decided to plough directly up the side of the next spur. My calves have never burned so hard after snow-shoeing up the very acute slope, high on my toes on every step.
At the top of the spur the path was obvious, and I could see the little MUMC hut perched high on a rise. I had made it onto Tom Kneen track after a fairly epic detour.
Back on route. MUMC hut visible at the tip of the spur. This is the Tom Kneen track.Nearly at the MUMC hut as the clouds draw in and it gets darker on the exposed ridge.MUMC hut peeking through the dead trees and brush
There were magazines and books in the hut. I sat and read one of the MUMC publications. In particular, a trip report on Passport to Insanity – often said to be the best line in Australia or even the universe!
Despite the accolades it is remote and rarely climbed! A giant off-width crack gives way to a splitter hand-crack through a daunting roof, so overhung that it in fact slopes back down from the face! The 8m roof was said to eat-up seven No. 1 cams! Being on the south of the Grampians, you can add to this wild exposure to the severity of southern ocean weather systems.
To complete the final pitch requires a ballsy tyrolean traverse to escape onto the main buttress. Either that or a sketchy and dangerous rappel off a single rusty, possibly now missing, piton. Even less people repeat the final pitch and the original descent. Hmmm…
I prepared to return to my shelter at the Federation Hut surrounds before sun down. The return path was more straight-forward and I skirted across the western face of the summit, re-joining the summit path to the cross. Cloud was now looming ominously over the Mt Feathertop Summit.
By late afternoon the snow was even softer on the Western face, making progress slow and slippery. Several times I found myself glissading uncontrollably even in my snow-shoes!
Mt Feathertop summit now shrouded in cloudA view back along the Tom Kneen track ridge
Before setting out to MUMC hut I met a middle-aged couple who had hiked up Bungalow Spur for the day. I had warned them the snow was becoming soft on my descent. On my way back I noticed the gentleman had made his ascent and was coming back down. He must’ve had an epic time on the soft melting face in all those clouds!
Mt Feathertop in whisps of cloud and late afternoon sun
The nights dinner was going to be pizza pockets. Rolling out dough was tedious but I managed to use a pan lid as a template. Somehow it turned out reasonably well, but the dough was not cooked through.
My toes were now frozen and numb. They felt woody and without feeling. I could not feel myself manipulating them.
I can see the three orange lights of Hotham shining like a beacon. For those late or lost in the back-country it would be a sign of hope. I go to bed early with the idea of climbing the summit for the sunrise before continuing my journey across the Razorback.
Day 3 – The Razorback Snow-Shoe Hike
North-west view from the Razorback showing Bungalow Spur and Mt Buffalo behind.
The Razorback is a grade 3 hike, but being mostly above the tree-line is severely exposed to the unpredictable alpine weather conditions.
Lovely and daunting morning view of the Razorback – today’s destination
No alarm. Cold again. Same story. I woke around 0830. It turned out my phone was underneath the sleeping pad – I don’t know if I didn’t hear it or it froze…
Reflective snow-flake from my winter trip to Finland. Pedestrians use them to be seen in the seasonal darkness.Firing up the stove for morning coffee
For breakfast I cook another eggs and bacon, this time with left over taco cheese. I drank most of the still warm Nalgene and relaxed. After breakfast I put out my sleeping gear, gloves, socks to defrost and dry in the sun. It is very important to take any opportunity to air out down gear – even in the snow. Especially in the snow.
Packing down camp with beautiful views of the today’s trekkingDecorating the trees with gearMy pack fused into the ice and needed some defrosting
I started to break down camp. Lesson: do not bury a light tarp in snow like I did. At least not when the snow is wet. My entire snow wall had frozen into an ice fortress. I had to chop the tarp out with the adze of my ice axe. As careful as I was I could not avoid cutting up the frozen stiff tarp in several places. I finally extricated the tarp after an hour of chopping put it out to thaw and dry as well.
Tarp in the solid ice wallChopped up tarp
There were some new arrivals at Federation Hut. After it quick chat, it turned out their intentions were the same as mine: a Winter Ascent of Mount Feathertop and hike across the Razorback.
The Inviting Federation Hut
I decided to skip a second summit as I had already savored the mount in solitude the day before. This way I could gain a head-start on the Razorback and be relatively alone for the remainder of my hike. I set out from the snow-gum at around 1030.
Sign-post for Razorback under the snow-gum on the saddle. Mt Feathertop in the background.Guys ascending Mt Feathertop
The beginning of the Razorback trail skirts the West side of Molly Hill through alpine shrubs. The trail is fairly constrained and to my annoyance was littered by deep post-holes. I had to continually pick my steps very carefully to avoid rolling an ankle or worse.
It amazed me how determined these boot-clad gumbies were to carry-on for literally hundreds of metres while post-holing up to their knees! I could see foot-prints in both directions so I anticipated reaching their turn-around point.
Looking back to camp and Federation Hut from the start of the RazorbackLooking north-west beyond the camp site and Federation hut to Mt Buffalo.View of Mt Feathertop from the start of the Razorback.Closer view of Mt Feathertop. Avalanche ridge is the prominent spur. Adam’s Rib and Avalanche gully to the left. Hellfire Gully and Hellfire ridge behind.Looking back to Molly Hill and Mt Feathertop from High Knob.
Just beyond Molly Hill the post-holes tapered out and the trail opened up. Claustrophobic shrubs gave way to steep icy slopes. Here I encountered a group of skiiers. After discussing the trail condition they decided to traverse the steep, bare eastern aspect of Molly Hill – a very exposed prospect!
Biting into the meat of the Razorback
Well worn path along the spine.
Up past High Knob. Mt Feathertop in the background.
Jagged rock features traversing to the west of Twin Knobs.
Somewhere around High Knob or Twin Knobs, I discovered my Nalgene bottle was no longer on my pack. It must’ve fallen out and slid into oblivion! This cut the days water supply in half.
View back to the knobs (lol) and Mt Feathertop.
The Razorback dips in the middle and there are more options for shelter if needed
Corridor of trees in the lower parts of the Razorback
New life on dead wood. Apparently Lichen is an indicator of Air quality.
The tree corridor descends further towards the lowest point of the Razorback.
Unfortunately this meant stopping to boil snow but a chance to enjoy my doughy, under-cooked pizza pockets. Around 1400 I stopped at the lowest point on the Razorback with stunning views of Mount Buffalo to the West.
Impromptu lunch stop with a nice log to sit on. This would be a potential area to camp.
Unlike Big Grassy, Big Dipper very distressingly lives up to it’s name. After passing a small dip and rise you wonder what the big deal is. Well the joke’s on you – that was only Little Dipper! As you rise above a crest, you see it and despair. Climbing out of the Big Dipper is a very steep and strenuous ordeal. Perhaps more strenuous than the Mount Feathertop summit itself, though I did not have my 20+kg pack at that stage.
Razorback, looking to Feathertop
Razorback, looking to Feathertop
View to Mt Hotham from the top of Big Dipper – the pin tower is really close now!
Trekkers ahead of me climbing up out of Big Dipper
Trekkers ahead of me climbing up out of Big Dipper
Bon Accord Hill where Bon Accord Spur intersects the Razorback.
I finally reach the intersection to Bon Accord Spur just before sunset. If I wanted to find any semblance of shelter I knew I would need to get off the exposed ridge line.
Bon Accord Spur heading off into the sunset.
Camp 2: Bon Accord Spur Old Hut Site
I began to hike down the Bon Accord Spur until I hit the treeline and decided to stop at the first flat piece of ground.
Sun setting by Mt BuffaloBeautiful purple colours in the snow as I head into the tree line.Getting dark as I finally find a suitable flat spot to set up camp.
It was not much but according to my best guess was near the location of the “Old Hut Site” (not to be confused with the “Bon Accord Hut” ruins). Night was closing in. I almost continued to search for a larger area but it is lucky I didn’t. The next day would prove no decent flat area for perhaps a kilometre of vague trail.
Final glimpses of the next day’s path as the sun sets.
The flat spot was just big enough for a single person to lie, and I had to shore up the edge with packed snow to gain a little more shoulder space. I created a much more temporary shelter this time as I planned only for one night. Somehow my cut-up tarp held and I guyed it out tight and low.
The first and only flat spot for several kilometres. Setting up camp in the dark.
Since I lost my Nalgene bottle, I had been forced to melt snow twice as often and would need to do so the next day too. My fuel supply was now dwindling and I was concerned I would run out that night. After days of wearing frozen boots, my toes were very numb.
I always avoid building frivolous campfires; however under these circumstances I believe a fire was justified. Being below the treeline, wood was now much more abundant and I was situated on a less popular and poorly maintained trail. I used fallen dead wood and kept the fire as small and as short-lived as possible. After I had cooked, I scraped up and removed the coals, scattering them in thick undergrowth, and covered it over with snow.
Fire in the snow. Dried gum-leaf tinder.
While the fire burned hot, I melted ample snow for several cups of tea and filled my remaining bottle. I cooked the now 5-day marinated butter chicken over the coals and toasted my naan breads. The smoke imparted from the coals added to the wonderful flavors and this was my best meal yet!
As I ate I rested my boots above the coals, until they finally extinguished. Through the black silhouettes of trees, I could again see the high-pressure sodium glow from Hotham Village. My candle gave the comforting illusion of warmth and a light by which to write my journal.
Cosy but temporary shelter
Day 4 – Bon Accord Spur Descent Hike
Bon Accord Spur is a grade 4 hike, very steep, overgrown and largely unmaintained between The Razorback and Ovens River (the majority). It was the original (and at the time only) access to Mount Hotham in the days long before the Great Alpine Road was constructed. In these early days skiiers and gold prospectors would make the steep hike with assistance of pack horses. I had no such luck and packed my own gear but I guess they didn’t have ultralight technical materials back then either!
The low slung tarp shelter on a shored up flatBon Accord Camp is all packed upView downhill to the West – the final leg of the journey
The trail from the snow line is so overgrown it is essentially a corridor of large gumtrees densely packed with smaller gumtrees. All you can do is thrash your way through climbing over or under the frequent fallen branch or trunk.
This is the actual trail in 2019. A corridor of small eucalyptus tress. For a one or two kilometres no less!
As I was beating through the scrub I was eagerly searching for the Bon Accord Hut ruins. Only a chimney remains and the map stated it is easy to miss.
Eventually I came to a clearing choked with bulldozed trees and rough cut logs. In typical Parks Victoria Fashion there was an ugly metal sign planted directly in front of the historic stone chimney, ruining the feeling of the place. I’d rather have searched and not found the chimney than run into this stupid junk sign ruining the sense of mystery and wild.
The Old Bon Accord Hut site Chimney
By this time I was working up a thirst and I was glad I had a full bottle of water from last nights snow-melting efforts. I thought I will ration it out as I will not be able to refill until reaching Washington Creek / Ovens River. I took several big gulps and nearly spat it out! The water tasted like campfire ash. Disgusting, but it was all I had for the next 5 kilometres.
Bon Accord Spur Trail – below the snow line but plenty of frost!
Bon Accord spur offered sporadic glimpses of the Razorback, Mt Feathertop and the Bungalow Spur. Only then did the full scale of the landscape become apparent. I enjoyed it every time as a strong sense of accomplishment overcame me.
Bon Accord Spur scenic glimpses of the Razorback.
Needless to say arriving at the river was a great relief. Tipping out the remaining water I filled my bottle fresh from the rapidly flowing creek and drank a litre on the spot. I could see where the Washington Creek had risen high around the start of the little bridge but there were no issues today.
Bridge over Ovens River and Washington Creek confluence.Washington Creek flowing rapidly where I filled up my water.
I’ve read that in past floods, the bridge had been torn clean off. I could see some remains deposited one hundred metres downstream. I paused to take some photos and thought about the destructive power of water and how high it must’ve been to tear the bridge away from its foundations.
The confluence of Washington creek and Ovens River. Bridge in the background.
The remainder of the trail West of the river was well graded and well-maintained. It snaked through long tracts of rain forest and remnants of the areas gold-mining history were apparent. Several sluice run-offs crossed the path and were made abundantly apparent by the brief, isolated and unnecessary Parks Victoria hand-railings.
I made a fast pace and was determined not to stop for lunch. By early afternoon I reached the Bon Accord Trail Head and began the 1.5km walk of shame through the small town of Harrietville back to the Bungalow Spur Trail Head.
Bon Accord Spur Trail Head. Not quite the end of my journey.Mt Feathertop warning.
Conclusion: The drive back to Hotham
It was a strange feeling sitting back in my car. I felt a strong sense of relief and at the same time some primal power. I had so much energy under my control. It was barely 30 minutes by the time I had driven back to Mount Hotham summit (perhaps a days hike).
View of the Razorback and Mt Feathertop from the Great Alpine RoadLooking out over the Razorback from Diamantina Hut (Mt Hotham)The Razorback and Mt Feathertop from Mt Hotham
I couldn’t help but compare the awesome power of my internal combustion engine to my grandfathers humble shellite stove which had slowly but dependably provided most of my drinking water for the past 4 days.
As I drove through Hotham Village, I found Frank Zappa’s Shut Up and Play Yer Guitar on the car stereo and spaced out for the final leg of this Alpine Adventure.
I hope you enjoyed this article and found it inspiring for your next adventure in the Australian Alps.
What would you like to learn more about in a follow up post? Please leave a comment, and don’t forget to subscribe below for more cursed ascents!
By purchasing from my affiliate merchants using the ads on this site, you are helping to cover annual hosting and production costs.